How to Get & Use iVCam Pro App: Complete Guide for Beginners & Experts
In today’s digital world, high-quality video streaming and camera functionality have become more crucial than ever, whether for online meetings, video calls, streaming, or recording. The iVCam Pro app is a popular solution that turns your smartphone or tablet into a professional-quality webcam for your computer. In this guide, we’ll walk you through how to get iVCam Pro and how to use it effectively for all your video needs.
What is iVCam Pro?
iVCam Pro is a premium version of the iVCam app, which allows users to turn their smartphones into high-definition webcams for their PC or Mac. It provides a seamless, high-quality alternative to traditional webcams, which can often be bulky or expensive. The iVCam Pro app unlocks several additional features that enhance its performance, making it an ideal choice for professional video calling, streaming, recording, and conferencing.
Key Features of iVCam Pro
High-definition Video Quality: Supports video resolutions up to 4K, making it perfect for professional streams, video calls, or content creation.
Wide Compatibility: iVCam Pro is compatible with both Windows and Mac systems.
Flexible Orientation: You can switch between landscape and portrait mode easily.
Low Latency: Minimal delay between your smartphone and the computer, providing real-time video streaming.
Multiple Devices Support: Allows you to connect multiple devices simultaneously for a more dynamic setup.
Advanced Audio Features: Full-duplex audio support for high-quality sound during video calls.
Now that you have a basic understanding of what iVCam Pro offers, let’s look at how you can get and use the app.
How to Get iVCam Pro App?
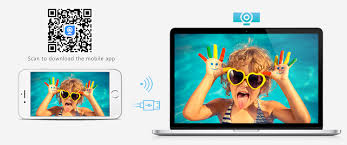
Step 1: Download and Install iVCam on Your Smartphone
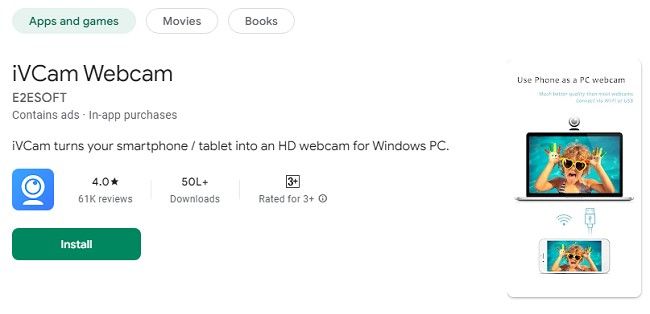
The first step to getting iVCam Pro is to download the app to your mobile device. iVCam is available for both Android and iOS platforms.
For Android:
Open the Google Play Store on your Android device.
In the search bar, type iVCam and press enter.
Find the iVCam app and click on it.
Press the Install button to download the app to your device.
For iOS:
Open the App Store on your iPhone or iPad.
Search for iVCam in the search bar.
Tap on the iVCam app from the search results.
Press the Get button to install the app on your device.
Step 2: Download the iVCam Client on Your Computer
After installing the iVCam app on your mobile device, the next step is to install the iVCam client on your PC or Mac.
Visit the official iVCam website or search for “iVCam client download” in your web browser.
Download the Windows or Mac version, depending on your system.
Once the download is complete, open the installer and follow the on-screen instructions to complete the installation.
Step 3: Purchase iVCam Pro
To access the advanced features of iVCam, including higher resolution, no watermark, and additional customization options, you’ll need to upgrade to iVCam Pro. You can unlock the premium version by purchasing it within the app.
How to Upgrade to iVCam Pro on Android:
Open the iVCam app on your Android device.
Tap on the Upgrade to Pro button or the Settings menu and look for the iVCam Pro option.
You will be redirected to Google Play Store to complete your purchase.
How to Upgrade to iVCam Pro on iOS:
Open the iVCam app on your iPhone or iPad.
Tap the Upgrade to Pro button located within the app.
Follow the prompts to complete the purchase through the App Store.
After purchasing, iVCam Pro will be unlocked, and you can start using all the features available in the premium version.
How to Use iVCam Pro App?
Once you’ve successfully downloaded iVCam on both your smartphone and your computer, and upgraded to the Pro version, it’s time to start using the app. Here’s how to make the most of iVCam Pro.
Step 1: Connect Your Mobile Device to Your Computer
Ensure your devices are on the same Wi-Fi network. Both your smartphone and computer must be connected to the same network to establish a connection.
Open the iVCam app on your mobile device.
Launch the iVCam client on your PC or Mac.
The app should automatically detect your smartphone, and within a few seconds, the video feed from your mobile device will appear on your computer screen.
You can also connect your device using a USB cable if you prefer a more stable connection. Simply plug your phone into the computer and select the USB mode in the iVCam app settings.
Step 2: Adjust Video Settings for the Best Quality
iVCam Pro allows you to customize several settings to optimize video quality. Here are some of the settings you can tweak:
Resolution: In the settings, you can choose between multiple resolution options, including HD (720p), Full HD (1080p), and 4K for the best possible quality.
Frame Rate: Adjust the frame rate to suit your needs. For smooth video, set the frame rate to at least 30 FPS, though 60 FPS is ideal for high-quality streaming.
Camera Orientation: Toggle between landscape or portrait mode depending on your preferred setup.
Focus and Exposure: Manually control focus, exposure, and white balance for more precise video quality.
Step 3: Use iVCam Pro for Different Purposes
iVCam Pro can be used for a variety of tasks. Here are some common uses and tips for optimizing the experience.
1. Video Conferencing
iVCam Pro provides a great solution for video conferencing applications like Zoom, Skype, Google Meet, and Microsoft Teams. Here’s how you can use iVCam Pro for video calls:
Open your video conferencing software (e.g., Zoom).
Go to the Settings menu and look for the Camera settings.
Choose iVCam as your webcam source.
Start your video call, and iVCam Pro will stream your smartphone’s camera feed to your computer.
2. Streaming and Content Creation
For streamers and content creators, iVCam Pro offers high-definition video and audio, making it a great choice for platforms like YouTube, Twitch, or Facebook Live.
Open your streaming software (e.g., OBS Studio or Streamlabs).
Select iVCam as your camera source in the settings.
Position your smartphone to capture the perfect angle and start streaming.
3. Recording Videos
Whether you’re recording tutorials, lectures, or personal vlogs, iVCam Pro ensures your video quality is top-notch. Simply select iVCam as your webcam source in any recording software (e.g., OBS, Camtasia, or Windows Camera).
Step 4: Customize iVCam Settings for Optimal Performance
To ensure a smooth experience while using iVCam Pro, consider adjusting some additional settings:
Audio Settings: Choose your preferred microphone settings if you're using the phone’s microphone for audio capture. Alternatively, you can connect an external mic for higher sound quality.
Background Removal: Some advanced features in iVCam Pro let you remove or blur the background, which is especially useful during professional video calls or streams.
Lighting Adjustments: If you're in a dimly lit environment, iVCam Pro offers automatic lighting adjustment features to enhance visibility.
Step 5: Disconnecting and Reconnecting Devices
Once you’re finished using iVCam Pro, you can easily disconnect the devices by:
Closing the iVCam app on your mobile device.
Exiting the iVCam client on your computer.
When you need to reconnect, simply open the apps again, and they should automatically pair if they’re still on the same Wi-Fi network.
Tips for Getting the Most Out of iVCam Pro
1. Use a Tripod or Mount for Stability
For the best video quality and stability, invest in a tripod or a phone mount. This ensures your phone stays steady, preventing shaky footage during video calls or streams. Many affordable options are available for smartphones.
2. Optimize Lighting
Good lighting is key to achieving clear, professional-looking video. Position your phone in a well-lit area, or use a ring light to illuminate your face. Avoid harsh backlighting, as this can cause your image to appear dark or silhouette.
3. Use High-Quality Audio
If your primary use for iVCam Pro is video conferencing or streaming, consider connecting an external microphone for improved audio quality. This can help eliminate background noise and ensure your voice is crisp and clear.
4. Experiment with Camera Angles
Experiment with different camera angles to find the best look for your video. For example, for video calls, position your phone at eye level to create a more natural and engaging experience.
5. Keep Your Phone Charged
Using your phone as a webcam can drain its battery quickly, especially if you’re streaming or using high-resolution video. Keep your phone plugged into a charger during extended use, or ensure it's fully charged before starting a session.
6. Test Your Setup Before Going Live
Before using iVCam Pro for important video calls or live streams, do a test run to check the quality of the video, audio, and lighting. This will give you time to make adjustments to your setup and ensure a smooth experience when you go live.
Frequently Asked Questions (FAQs)
1. Can I use iVCam Pro without a USB cable?
Yes, iVCam Pro works wirelessly over Wi-Fi, as long as both your smartphone and computer are connected to the same network. However, using a USB connection may reduce latency and improve performance.
2. How much does iVCam Pro cost?
The cost of iVCam Pro varies depending on your region and the platform. On average, it’s a one-time purchase with pricing starting around $9.99. However, always check for any promotions or discounts available.
3. Does iVCam Pro support background blur?
Yes, iVCam Pro offers background blur and background replacement features to enhance video calls and streams.
4. Can I use iVCam Pro for live streaming on Twitch or YouTube?
Yes, iVCam Pro is compatible with streaming software such as OBS Studio, Streamlabs, and XSplit, making it an excellent choice for live streaming on platforms like Twitch, YouTube, and Facebook Live. Once iVCam Pro is set as your video source, you can start streaming with high-definition video directly from your mobile device.
5. How do I ensure the best video quality while using iVCam Pro?
To ensure the best video quality, make sure that you:
Use a stable Wi-Fi connection or connect via USB for lower latency.
Set the resolution to 1080p or 4K, depending on your needs and the capabilities of your device.
Adjust focus, exposure, and white balance in the iVCam settings for optimal lighting and sharpness.
Make sure your phone’s camera is clean to avoid blurry or pixelated video.
Ensure that your phone is mounted on a stable surface or tripod for the best video angles.
6. Is there any difference between the free version and iVCam Pro?
Yes, there are several differences between the free version and iVCam Pro:
The free version includes a watermark on your video feed.
The free version may limit you to lower resolutions and fewer features.
iVCam Pro removes the watermark, supports higher resolutions (up to 4K), and provides additional features like background blur and multiple device connections.
iVCam Pro also includes faster video streaming with less latency, making it ideal for real-time applications like video conferencing and live streaming.
7. Can I use iVCam Pro on both Windows and Mac computers?
Yes, iVCam Pro is available for both Windows and Mac operating systems. Simply download and install the iVCam client on your computer and follow the same connection process as described above.
8. How do I fix connection issues with iVCam Pro?
If you encounter issues with connecting your smartphone and computer:
Ensure that both devices are connected to the same Wi-Fi network.
Restart both your mobile device and computer.
Try connecting your device using a USB cable if the Wi-Fi connection is unstable.
Make sure the iVCam app on your phone and the iVCam client on your computer are both up-to-date.
Disable any firewall or antivirus software that may be blocking the connection.
9. How many devices can I connect to iVCam Pro?
iVCam Pro supports connecting multiple devices at the same time. This is useful for situations like multi-camera streaming or video calls where you want different angles or different participants. You can use a second device to create a more dynamic presentation or conversation.
10. Can I use iVCam Pro for recording podcasts or voiceovers?
Yes, iVCam Pro supports audio capture through your smartphone's microphone or any external microphone you connect to your device. This makes it a useful tool for recording podcasts, voiceovers, and other audio-centric projects, especially when combined with the high-quality video capture.
Conclusion
The iVCam Pro app is a powerful tool for turning your smartphone into a high-quality webcam for your computer. With its advanced features, including high-definition video, low-latency performance, and professional-grade audio, iVCam Pro provides an affordable alternative to traditional webcams. Whether you're using it for video calls, streaming, or content creation, iVCam Pro’s versatility and ease of use make it an invaluable tool for both personal and professional applications.
By following the steps outlined in this guide, you can easily get and set up iVCam Pro, ensuring that you can take full advantage of all its features. With its seamless integration with both Windows and Mac computers, multiple device support, and customization options, iVCam Pro is the perfect app for anyone looking to enhance their video experience.
Take your video calls, streams, and recordings to the next level with iVCam Pro, and enjoy professional-quality results every time!
Trending Now
Updates